Image Map
Showing posts with label organized classroom. Show all posts

Sunday, November 10, 2013

Give Away for Upper Elementary

As I was scoping out some of my favorite blogs tonight, I found that some blog members are giving away some pretty fabulous items. Now we all love free items so from November 11th to November 17th, they will be giving away free items as a way for teachers to thank teachers! How exciting is that?

I found this on Teaching to Inspire in 5th a great website for teaching in the upper elementary grades! So check out their freebies!!


Saturday, November 2, 2013

What's Your Schedule Look Like?

I was just reading through some blogs and there is a Linky Party going on about what your Daily schedule looks like across the states. It's interesting to see different teacher schedules in different areas. I am linking up with Susan at Thank God it's First Grade. Now I must admit I am a bit jealous of her schedule and wish I had something like it, but it is what it is.

So like Susan I am curious as to what everyone else's schedule is like!!
How long is your school day? How long do you have for each subject? Do you have a Social Studies or Science block? Do you get time for planning or PD each week?
I am NOSY!
Here is my Daily Schedule:

Monday & Wednesday

8:15 to 8:45 -     Breakfast in the Classroom and Read to Self
8:45 to 9:30 -     Science/Social Studies
9:30 to 10:10 -   Specials
10:10 to 10:30 - Calendar Math
10:30 to 11:30 - Math in Focus
11:30 to 11:45 - Vocabulary
11:45 to 12:05 - Read Aloud
12:05 to 12:40 - Lunch/Recess
12:40 to 2:20 -   Daily 3 Reading/Writing Block with Conferencing
 2:20 to 2:45 -    Wellness (every other day) On off days we continue reading/writing
 2:45 to 3:30 -    Extra Round of Reading

Tuesday & Thursday

8:15 to 8:45 -     Breakfast in the Classroom and Read to Self
8:45 to 9:30 -     Science/Social Studies
9:30 to 10:10 -   Specials
10:10 to 10:30 - Calendar Math
10:30 to 11:30 - Math in Focus
11:30 to 11:45 - Vocabulary
11:45 to 12:05 - Read Aloud
12:05 to 12:40 - Lunch/Recess
12:40 to 2:20 -   Daily 3 Reading/Writing Block with Conferencing
 2:20 to 2:45 -    Wellness (every other day) On off days we continue reading/writing
 2:45 to 3:30 -    Technology

Friday

8:15 to 8:45 -     Breakfast in the Classroom and Read to Self
8:45 to 9:30 -     Library Skills/Checkout
9:30 to 10:10 -   Specials
10:10 to 10:30 - Calendar Math
10:30 to 11:30 - Math in Focus
11:30 to 11:45 - Vocabulary
11:45 to 12:05 - Read Aloud
12:05 to 12:40 - Lunch/Recess
12:40 to 2:20 -   Daily 3 Reading/Writing Block with Conferencing
 2:20 to 2:45 -    Wellness (every other day) On off days we continue reading/writing
 2:45 to 3:30 -    Reading with our First Grade Buddies

Now to answer the questions:

How long is your school day? Our school day officially starts at 8:30, but kids start coming into our classroom about 8:15 when buses arrive with their breakfast. They are to get their book boxes and read independently during this time when they are finished with breakfast. This breakfast program just started this year, and all students get FREE breakfast! Our school day is 7 hours.

How long do you have for each subject? We are mandated to spend 60 minutes a day in Math in Focus and 60 minutes a day with Treasures for Reading. I use a bit of Treasures, but also mix in other mini lessons through out my Daily Reading time. We are also suppose to teach a certain number of minutes of Science per week too.

Do you have a Social Studies or Science block? Yes, we get 45 minutes M-Th and integrate it in reading throughout the week.

Do you get time for planning or PD each week? We (my grade level team) meet with our Instructional Facilitator during one of our Specials each week for planning and Data. My partner teacher and I also meet whenever we need to and make our own plan for that.

Now I'd love to hear more from each of you!!! What is your schedule?


Sunday, October 6, 2013

Class Dojo

This year I am trying something new for classroom management and so far it seems to be working great! We are are doing the Class Dojo in our room. This is an online classroom management tool that you can monitor both positive and negative behaviors of your students. We strive to find the positive behaviors and students have really responded to this!

If you haven't checked out this site yet, you really should! They have thought of so much and you can customize the behavior goals to fit your classroom!! This can also be accessed by parents and students so they are always aware of the behaviors! In addition, you can download an app to your smart phone and you have access throughout the day to add or take away points! What a great tool!

Wednesday, August 21, 2013

From DRAB to Color FAB!!

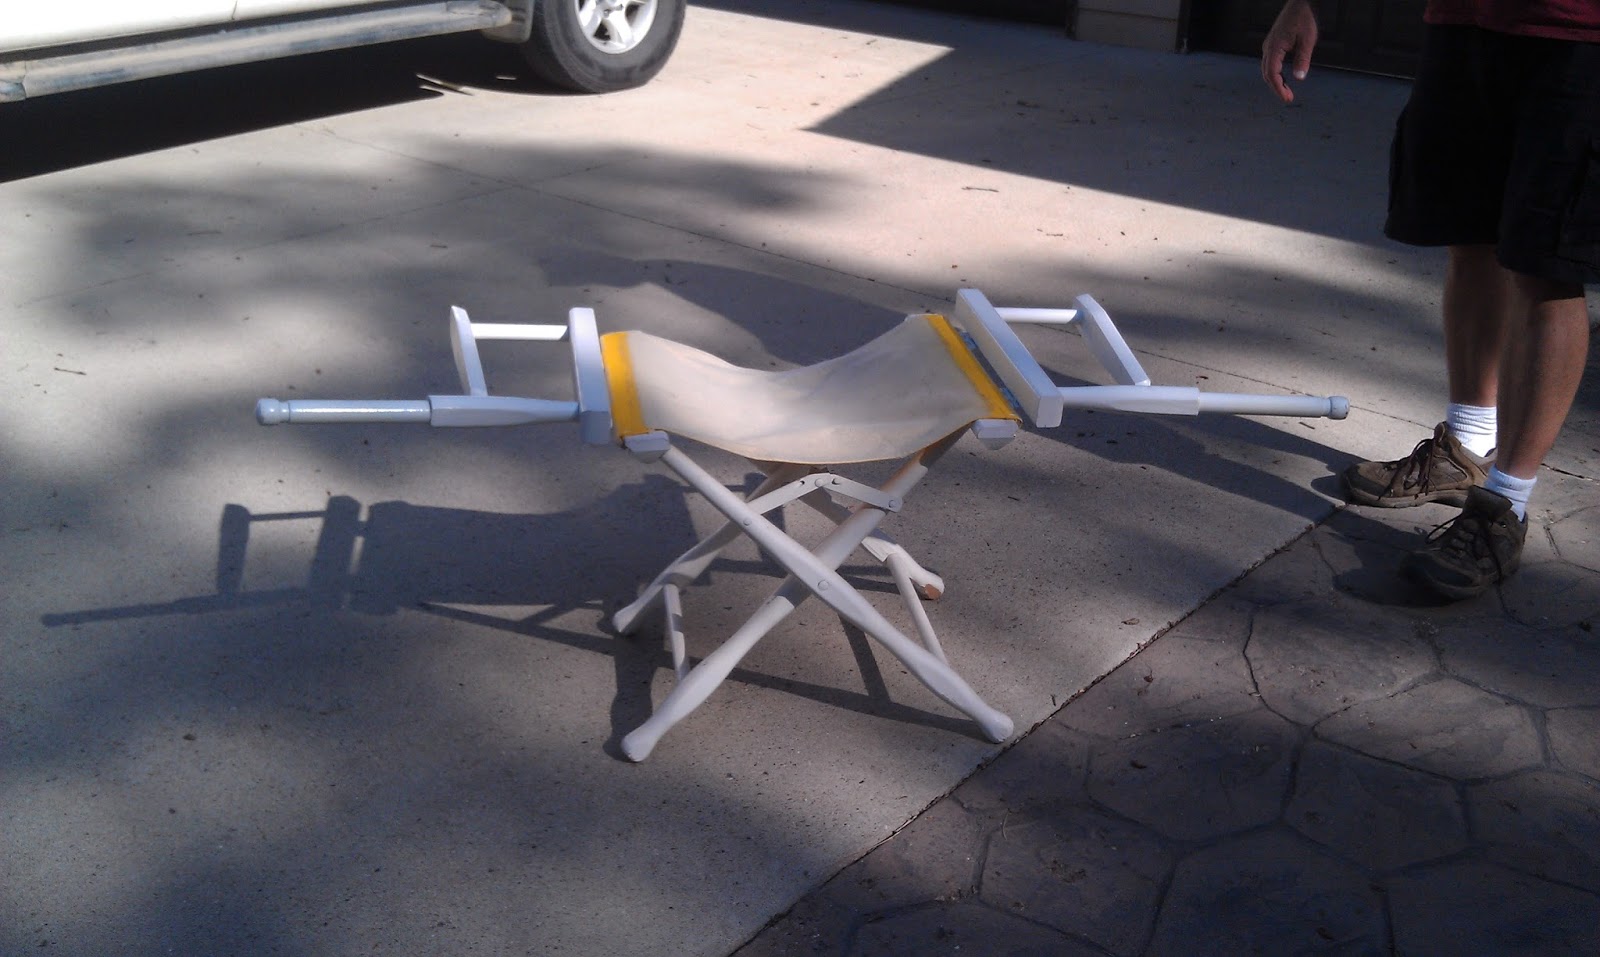
So, I was shopping at the goodwill and I ran across this old Directors chair and I picked it up for $5.00.

 
The first thing that we did was take it apart, and we (my husband and I) sanded down the white paint and then spray painted the frame of the chair bright orange! That was the easy part! Next I took the old fabric and thought I would dye it dark purple The dye did not take at all and it turned out awful!!
 
So I had to figure out what to do next!! I can not sew.... so I knew that I had to find someone else to sew a new seat for me. So lucky me, I was able to enlist the help from my friend Michelle and she sewed me new bright purple fabric for my chair!! Below is the finished product!! I'm so excited to put this new bright chair in my classroom!! It really will brighten up my room!!


Sunday, August 4, 2013

Classroom Check Out Board!

Well, I have been absent lately! I have been busy with summer school, but it has now ended. Now it's time to start getting my classroom ready for the year. I feel like I am so behind!! I will be working in the classroom this week, but next week I will be taking a STEM Science class with our district, so I've gotta get busy! Tonight, I made a checkout board for the classroom. I really think it turned out cute, and hopefully the kids will like using this system for signing out of the room.

To make this I bought a bright purple magnet board, magnets, rocks, sticky tape, washi tape, and duck tape. Oh and I got fun sticker letters too! I used the duck tape around the edges of the board and I used the washi tape to divide the sections of the board.

Check out my finished product! It should be fun in the classroom with this interactive sign out board!!


Monday, July 22, 2013

Top "Pop" Stars idea from Christi Fultz

Well, I did it! I made the board that I was inspired to make by Ms. Fultz. I made the Top "Pop" Stars board that I will use to check and see if all classwork and homework is complete each day.

I am making a change in my classroom by giving my students numbers. I usually don't do that, but the more I have been thinking about it the more I think it will save me time! I love the idea of having the students put the work in order each day by student number, and I can see who still hasn't turned everything in. It will be awesome!

Okay so to start I went to Hobby Lobby and bought: a Black Magnetic Board, Washi Tape, Bottle Caps, Scrapbook Paper, and Magnets.
Next, I got out my Cricut and cut out the letters for Top "Pop" STARS with the numbers 1 to 5. I used Multi colors to get this done. I love bright colors!! Once I cut the letters out I laminated them to make them last longer!! Lamination is another BRILLIANT invention.

Next, I arranged it on my board and used the Washi Tape to make a grid. Inside the grid I placed the Bottle Caps using the magnets to apply them to the grid. I wrote student numbers on each of the Bottle Caps. Currently, I only have 15 students in my 5th grade class this year, but I made 20 Bottle Caps. This grid will be used to roll dice for students to win rewards if they have their work turned in for the week. I will make one dice with the letters STARS on it and another dice with the numbers 1-5 on it. I will roll the dice and let's say I roll a purple S and a 2 then the student whose number is in that intersection wins! I haven't come up with all of the prizes, but they will be things like: take your shoes off for the day, sit with a buddy, teacher helper, etc....

The catch is students who have missing work will have to take their numbers off the board until their work is caught up. On Friday I will roll the dice and those students who have all of their work turned in will have a chance to win! They will be able to place their Bottle Cap anywhere on the grid if there is an empty space, that way they are more in control! I'm excited about this, and hopefully this positive reward will motivate students to always have their work done in a timely manner!!

Here is a what my board looks like! The lighting isn't great, and I need to get a better picture, but this is what I have for now. I had to use my phone to take pictures tonight!

This idea was originally from Ms. Fultz and you can see her completed board here! She has awesome ideas, and this was fun to make!

Sunday, July 14, 2013

Decorative Clipboards

I have had a busy weekend...refabbing my not too pretty clipboards! I got the idea from Pinterest and another blogger. The original blog was my inspiration, Literacy Spark. Thanks so much for the idea!!

So I went out to my classroom and I picked up 20 of my clipboards from my classroom. My husband and my son thought I was crazy when I told them what I was about to do, but they thought it was a cool idea. The next day I was off to Hobby Lobby to buy some supplies. I bought scrapbook paper, Exacto Knife, and Designed Scissors. I also needed Mod Podge, but I had some of that on hand. Once I had this I was ready to get started!! Yay!

Here is a picture of some of the clipboards before I started.


The next step was to create a template around the clipping mechanism on the clipboard. Let me tell you it was a pain, and I had to enlist the help from my husband! Once we got that under control I traced the template for the top half of my clipboards. I knew that I wanted two color designs to create a more custom look. After I had the template cut out, I checked it on the board to find out if it fit, and to see if I needed to adjust it anymore. Please make sure you do this, as I usually had to adjust it a bit each time. Once I was comfortable with the fit, I then used a paintbrush and put a coat of Mod Podge on the top half of the clipboard and also on the back of my cut scrapbook paper. Next, I carefully laid the scrapbook paper on the top half of the clipboard, lining it up as I went. I then smoothed out the paper and got out any bubbles using a ruler and a dish towel. I set it off to the side and allowed it to dry. I would wait at least 30 minutes. Below is a picture of what they looked like with half of a design.


Once I got the scrapbook paper and Mod Podge applied to the tops of my clipboards, I was now ready for the bottom half. Next I had to decide the scrapbook paper that I wanted to put with these. I once again had to create a template for the bottom half. I then cut out the scrapbook paper for the bottom half and did the same process as I did above by applying the Mod Podge to the clipboard and to the back of the scrapbook paper. Note: you may want to cut the top half with designer scissors, so you don't have to worry about getting the cut exactly straight. I remembered on some, but forgot on others. Be sure and get all the bubbles out and wipe of any excess Mod Podge.  Now, please set these off to the side and allow to dry again for at least 30 minutes. I waited a bit longer, because we were out running errands. You may also need to take an Exacto Knife and trim the edges of the clipboard. I had to do it on several boards, no matter how good I thought my cuts were going to be.

Once they were dry it was now time to add a layer of Mod Podge to the top of the scrapbook paper. So again I took my paintbrush and I painted on the Mod Podge to the top of the entire clipboard. I let it dry, and then I did the process one more time.


Once the clipboards were completely dry, I was all set and my new refabbed clipboards were ready!! I am so happy with the clipboards as they are bright and happy and will fit into my bright classroom.


Completed Clipboards!
Once I finished my clipboards I ran into another site that had some great ideas on this topic. One thing they suggested to do was to take the clipping hardware off the boards first. They also suggested painting both sides first. I left the backs of my clipboards as is, but paint on the back might have been a good thing to hide the ugly brown. I am happy with what I did, but click here if you want to see the other examples.

I had a ton of fun, but let me tell you this isn't a quick project. However, if you are willing to put in the time you will create some fun clipboards for your organized classroom!

So do you have any ideas to share about other cool ideas in your classroom??

Tammy


Related Posts Plugin for WordPress, Blogger...